Wednesday, March 30, 2011

More homemade goodies for the freezer!

Another one of my favorite cookbooks these days is "Taste of Home:  Mom's Best Made Easy".  I came across this recipe, and had to try it!

Easy Egg Rolls
1 pound of ground beef
1 package (16 ounces) coleslaw mix (not the kind with dressing)
2 tablespoons soy sauce
1/2 teaspoon garlic powder
1/4 teaspoon ground ginger
onion powder to taste,
40 egg roll wrappers
1 tablespoon all purpose flour
Oil for frying

In a large skillet, cook the ground beef.  Drain very well.


In a mixing bowl, combine coleslaw mix, soy sauce, ginger, garlic powder and onion powder. 

Add the ground beef and mix well.

In a small bowl, mix the flour and enough water to make a paste.  (I actually omitted this step, and used plain water.)
Working with one egg roll wrapper at a time, Place a heaping tablespoon of beef mixture in the center of the wrapper.  Keep the other wrappers covered with a damp paper towel.


Fold the bottom corner over the filling:


Then the side corners into the center:

Moisten the top corner with your flour/water paste mixture, (or plain water), and roll up tightly:


Place on a parchment paper lined cookie sheet until all egg rolls are made.


Those are Brittany's fingers, so I figured she wanted to be included in this post.  Here she is:

Whoops, guess I was wrong!

In an electric skillet, heat 1 inch of oil to 375 degrees.  Fry egg rolls 3-5 minutes, or until golden brown.  Serve with sweet and sour sauce, if desired.  I actually cooked them in the oven the first time.  Arrange on a cookie sheet, spray with non stick cooking spray, and bake at 375 degrees until golden brown.  They were good that way too, but next time, if I have room on my stove, I will fry them.

This recipe made 40 egg rolls, which is way too many for us to eat at one meal.  So, you guessed it, I froze them!  After lining them up on cookie sheets, I stuck them in the freezer.  Once they were solid, I removed them to a ziptop bag, and labeled them.  This way, I can take out only what I need for a snack or a meal.  All in all, this recipe took me about an hour to finish.

I can see that this recipe would be very versatile, as well.  Next time, I will use ground pork, and possibly add some bean sprouts.  You could vary the amounts of garlic, onion, and ginger powder you use.  You could also substitute teriyaki or plum sauce for the soy sauce.  Use this as a spring board....as an almost complete departure from the traditional egg roll, you could use ground pork, barbecue sauce, and coleslaw mix for a pulled pork sandwich type of experience.  Experiment, I know I'm going to!


Tuesday, March 29, 2011

Recycled Wool Sweater, Part 2

In yesterday's post, I showed you the hats I made with the recycled wool sweaters.  While I really enjoyed that project, it did leave me with a problem.

What in the world was I going to do with 3/4 of a sweater?  Throwing this out was not an option, nor was putting it back in a bag in the garage.  What to do, what to do...I know, I'll make a bag!

To begin, I cut off the features of the sweater that I wanted to preserve, namely the buttons and the pockets.

I squared up the pieces, to get some idea of the size of the bag I would be making.  Basically, the sweater dictated everything about the finished bag to me.

I did not work from a pattern at all on this.  I did determine that the button bands, as they were, were way to bulky.  Plus, I did not want my bag to be unbuttoned.  So, I set about to "de-bulk" them, and sew the sides closed.


I cut away the extra bulk of the sweater, making sure to leave the buttons in place, which is what those little square are:


I matched up the pieces again, and sewed them together through both pieces:

Next, I figured out what I wanted to do about handles.  My goal was to use as much of this sweater as I could, so I cut strips out of the upper back of the sweater:

I sewed these into tubes, and turned them right side out.

They were a little stretchier than I wanted, so I threaded a piece of bias tape through them, and sewed them across the ends.

I didn't relish the idea of sewing through two layers of wool sweater;  my poor sewing machine was not looking forward to it either, so I went to the stash in the garage and found some lightweight denim fabric, which I used to frame the sweater pieces.  Plus, it gave the bag a classic "jeans and sweater" look.
After sewing the pieces together, I had this:

Not enough structure for the type of bag I had in mind.  So, back to the garage, where I found a large piece of mat board, left over from another project.  I measured, cut and taped, and made this framework for the interior of the bag:

Which meant that now it was time to make a lining.  Back to the garage for fabric and fusible fleece, plus the instructions for the bag I made my mom for her birthday last year.  I really liked how the pockets in that bag worked, and wanted to make some for this bag.  I love pockets in tote bags!

The pockets for one side of the lining with various objects showing where the pockets are.  I made the other piece with 4 pockets.
Next, I finished the lining, and squared off the bottom:


After inserting the lining into the bag, I pinned around the top edge, in preparation for hand sewing the lining in.

And here is the finished product:


I LOVE this bag.  It is the right width for holding skeins of yarn upright, which really helps with center pull skeins.  I can use this bag when I knit on the go, and it will keep the yarn contained.  Lots of interior pockets for needles, hooks, scissors, etc.  And, it was a stash buster project!  I did not buy one new thing in the construction of this bag!

Someday, hopefully soon, I will be making a different style bag from the other hat.  When I get it finished, I will post it here!


Monday, March 28, 2011

Recycled Wool Sweater, Part 1

Quite a long time ago, I got some ideas for using old wool sweaters for felted projects.  I went to a thrift store near my mom's house and bought several of them, came home, and threw them in the washing machine and shrunk them.  On purpose.  Two of said sweaters were cut up immediately and made into cell phone cases and coffee cup sleeves for our boutiques.  I still have them.  They didn't sell.  Not one.  So....I decided it was pointless to do any more.  Which left me with 3 felted wool sweaters.  Enter the chemo cap project.

I was web surfing, looking for chemo cap patterns, when I happened on a site for making caps out of recycled wool sweaters.  I neglected to note the website, and so cannot share the exact link for you, but if you do a search, you'll come up with dozens of other sites, all similar.  (I'm so sorry I didn't save the link.)

Anyway, that site jogged the memory of these sweaters languishing in a bag in the garage, so I retrieved two of them and got started.


The first step was to make a paper pattern.  I used the finished dimensions of another hat that I had, measured out the height and width, then "connected the dots".  After cutting out the pattern, I pinned it to one of the sweaters, and cut out two pieces.


Putting right sides together, and pinning around, I got this:

Well, okay, that's a different sweater, but you get the idea!

Sew a quick seam, using a 1/4" allowance, to get this:


Turn your hats right side out, and presto!


One hundred percent wool hats, in under an hour!  Plus, I not only repurposed something, I cleaned out a bag in the garage!

Sunday, March 27, 2011

Chemo Cap Ministry

About a month and a half ago, a ministry was started at our church to provide chemo caps to one of our local hospitals.  The lady heading up this ministry offered patterns and lessons for knitting, crocheting and/or sewing various chemo caps, and even offered materials, if necessary.

I decided to join, as I've gotten kind of fond of knitting hats, and have lots and lots of yarn in the garage just waiting for a worthy project.  Seemed like it was meant to be.  I'd purchased lots of yarn to use for a Prayer Shawl Ministry that hasn't gotten off the ground yet, so perhaps this would be a stepping stone.

This ministry was really tailored to offer something for everyone.  Can't knit?  Crochet.  Can't crochet?  Sew.  Can't do any of the 3?  Volunteer to make the cards added to each one.  That not your cup of tea either?  You can help out financially.  I think the turn out and support offered far exceeded anyone's expectations!  The organizer of this decided to have a goal date of March 22, and was hoping to have 50 caps done by this date.  Through members of our congregation, and other knitters in the community, I believe over 100 caps were completed. 

I'd really anticipated contributing heavily to the finished cap pile.  Unfortunately, the Easter Dress Project began at the same time, and I really focused my attentions there.  And ironically, although I pictured my
self knitting caps,  I only finished one (which isn't pictured here; I donated it to one of the ladies at MOPS, who wanted one for a family member.)  I took advantage of the offer of lessons from an experienced crocheter, and tried my hand at crocheting hats.

Here is a picture of the caps that I donated:
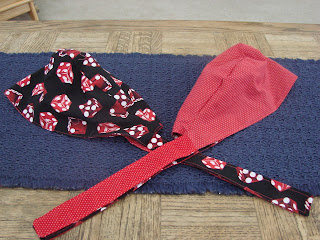
The baseball hat in back and the blue hat in front are crocheted.  The two ribbed caps are made from recycled wool sweaters, and the two on the right are "do rags", made from cotton fabric.  I have 2 other crocheted hats in progress, that I will hopefully finish in time for the March Project wrap up.


Here is a closer picture of the baseball hat.  I was browsing for patterns, and came across this.  I operate in a strange kind of way.  When I see something kind of challenging, I have to try it, just to see if I can do it.  This was one such project.  I did hit a snag, and had to pull out quite a bit, but figured out where I went wrong, and was able to fix it.  The bill is two crocheted pieces, worked over a piece of plastic canvas.  I'm very pleased with how this one came out, and hope to make a few more!


Here are the 2 do rags. They are reversible, and I used each of the two fabrics in both hats.  I have a stack of fabric waiting for me to do some more of these.  They were very quick projects, and seem as though they would be very comfortable in the summer weather.

Once my Easter goals are met, I hope to return to doing some more of these.  There is some talk about extending the ministry, to make it an ongoing project.  I hope they do!

Saturday, March 26, 2011

Soup Day, part 2

As promised, here is the recipe for the Pioneer Woman Sherried Tomato soup, with a modification.

1 medium white or yellow onion, chopped
6 tablespoons butter
Two 14.5 oz cans diced tomatoes
One 46 oz bottle or can of tomato juice (I used vegetable juice)
3 to 6 tablespoons sugar
1 or 2 tablespoons chicken base, or 3 chicken bouillon cubes
Freshly ground black pepper
1 cup sherry (optional, but it really adds a nice flavor)
1 1/2 cups heavy cream
1/4 cup chopped flat leaf parsley
1/4 cup chopped basil

Melt the butter in a large pot.  Add the onion, and sautee until translucent.

Add the diced tomatoes, then the tomato juice.  Stir to combine, then stir in the sugar and bouillon.  (I used 3 tablespoons of sugar, and bouillon granules.)

This is where I changed the recipe slightly.  The first time I made this soup, I made it exactly as written, and it was good, but I didn't like the feel of so many chunks.  I wanted a really smooth soup, so I used my immersion blender to puree it.  You could do the same thing with a regular blender or food processor, working in batches, and returning it to the pot.
Add the black pepper to taste, and stir to combine.  Heat almost to boiling, then turn off the heat.  Now to add all of the flavor...the sherry!


Next, add the cream and the chopped herbs.


Stir to combine, and enjoy.  Both times that I've made this, I've frozen it in individual portion sizes, and it reheats beautifully.  Just the thing to have on hand for rainy, cold days.  Try this soup, you won't be sorry!


Friday, March 25, 2011

My soup day

As you no doubt know, my husband has built a fabulous garden for us in the backyard.  I like to refer to it as "my garden", but the realtiy is that it is his, and he takes great pride in it.  He designed it, built it from the ground up, hauled the dirt, installed the irrigation system, and does most of the planting.  The only part that is truly mine is making yummy things from the produce that results.

Last fall, we planted broccoli, cauliflower, brussel sprouts, cabbage, carrots, and romaine lettuce.  While everything did pretty well, we are particularly pleased with the cauliflower.  Two weeks ago, Don picked the last 3 heads.  Don cut 2 of them into florets, blanched them, and left them for me to freeze.  We got 4 one pound packs to put in the freezer.  With the last one, I decided to make Cream of Cauliflower Cheese soup.
Katie, holding one of the "smaller" cauliflowers. 
Here is my recipe for Cream of Cauliflower-Cheese Soup:
4 cups fresh Cauliflower florets
1 1/2 cups chicken broth
1 tablespoon butter
1 tablespoon flour
1/2 teaspoon celery seeds
1/4 teaspoon salt
black pepper to taste
1 cup milk or half-and-half
1/2 cup shredded American cheese

I cut up the last cauliflower and came up with 16 cups of florets, so I made a quadruple batch.


Step one:  In a large saucepan, cook vegetables, covered, in a large amount of boiling water for 8 to 10 minutes.  Set aside 1 cup of cooked vegetables. (I skipped this part.)

Step 2:  In a food processor combine the remaining cooked vegetables with 3/4 cup of broth.  Cover and process until smooth, about 1 minute.  Set aside.  (I pureed the whole amount of vegetables.)

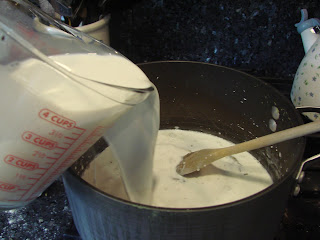
Step 3:  In the same saucepan, melt butter.  Stir in flour and seasong.  Add milk all at once.  Cook and stir until slightly thickened and bubbly.  Cook and stir 1 minute more.


Step 4:  Stir in blended vegetables, remaining broth, and cheese.  Cook and stir until heated through, adding additional milk if necessary, to reach desired consistency.  If desired, season with additional salt and pepper.  (Here, I added a little bit of fresh ground nutmeg.)

I didn't have shredded American, so I cubed a pack of slices.


Of course, being me, I packaged most of this soup in single sized portions, and put it in the freezer.

Many packages of yummy goodness!  I hope you try this recipe, it's great for rainy days!

(Up next, the recipe for Pioneer Woman Sherried Tomato soup, pictured above!)