Showing posts with label crafts. Show all posts

Saturday, June 18, 2011

May Projects

Well, here it is, the middle of June, and I bet you thought I forgot this post, didn't you?

Nope, just had more pressing things to share with you, but here it is, the May Projects post!

First up, the counted cross stitch picture that I made for Don:
This was supposed to be for our anniversary, which was on Easter Sunday.  For obvious reasons, I didn't finish on time, but this was the first project I worked on post Easter dresses.  I haven't ironed or framed it yet, however.

After spending 3 months on Easter dresses, the month of May was all about instant gratification type projects.  Here is a picture of almost everything finished:
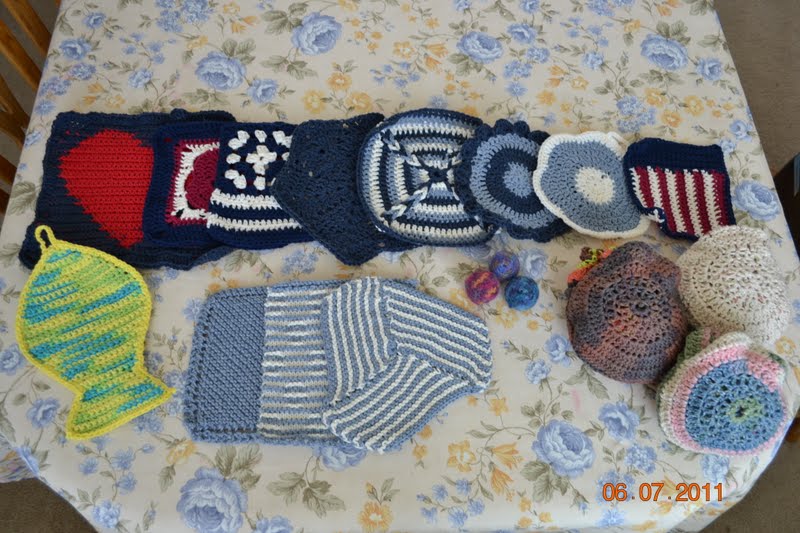
See?  All things finished in a few days or less.  You remember that I've said I don't crochet, right?  Well, apparently, now I can crochet, at least a little bit.  It's still not my favorite, but I'm at least able to move a hook around and complete something.  I decided that dishcloths were the perfect thing to practice on.

These are all crocheted.  The dark blue hex in the back came from Lion Brand website.  The fish cloth came from here.  The red heart dishcloth I made up to test a technique I read about.  The red and white stripe "flag" sort of one came from another website, (and my apologies that I can't find it now), and the rest came from various booklets that I've picked up in the last few years. 

Here are the knit cloths I did in May:

See the cloth in the middle?  That is an optical illusion cloth, and I found the pattern here.  The cloth on the right is just a simple cloth, like the kind my mom taught me years ago.  The one on the left is my favorite, though.  Here is a picture of it by itself:

If you look at it from above, it looks like a striped cloth, but look at it from an angle and you see:

flowers!  Isn't that cool?  It's all done using strategically placed knits and purls.  If you like it, you can find the pattern for this one, plus a lot more like it, here.  This is the vintage flowers cloth.  By the way, all 12 dishcloths were made from stash yarn.

But, I did not stop at dishcloths.  No, not me!  I also made a handful of:

cat toys, for my Secret Sister at church.  Well, not for her, exactly, but for her 2 furry children.  These were made with 100% wool yarn, then, before completing the ball, a giant jingle bell was put inside, then the whole thing was felted.  When I revealed to her that I was her Sister last week, she said that her cats loved them!  Silly, but hey, it was stash yarn!
I also learned how to make market bags, but market bags with a twist.  These, when turned inside out, can be tucked into themselves, and become just right for keeping in a purse (if your purse is large, like mine) or stowing under the seat in the car, just in case.
Three marekt bags, folded up.
Three market bags, ready for shopping!
The bag in the center was made from stash yarn, the bag on the left was from yarn that my mom gave me, and the bag on the right, I bought new, specifically to match a beach towel I was giving as a gift:


I also made 3 pairs of children's ladybug slippers, which of course I forgot to take pictures of before I gave them to the person that requested them.  I do have an order for 3 more pair, so I will be sure to take pictures of those to show you.

So it was a rather productive month, using mostly what I had in house.  And I have a box full of goodies to show for it.  Might be time to take on some larger projects again soon, though.  I've already finished a couple of things this month...can't wait to show them to you!

Monday, May 30, 2011

Accordian Scrapbook Tutorial

A few days ago, I mentioned that the elementary school had hosted a craft/rummage sale as a school fundraiser, and that I made some small gift bags.  At the same time that I was making the gift bags, I was making small scrapbooks, which I also learned how to do at MOPS.  Unfortunately, I only got a few completed, and opted to leave them home until the next show, when I would be able to finish some more. 

I did take pictures of the process though, so I'm going to share them with you now.

Supplies needed:
2 Foam core squares, cut 6" by 6"
3 12" x 12" pieces of cardstock
Scrapbook paper:  2- 8" x 8" squares, 3- 5 1/2" x 5 1/2" squares, and twelve triangles, cut from 5" squares
Glue
Tape
Ruler
Butter knife
Ribbon

Step one:  Cover the foam core boards using the 8" squares of scrapbook paper.  I found that it helps to wrap them, as you would a gift.  Secure the edges with tape, if desired.


Step two:  Using a ruler and the back side of a butter knife, score the 12" cardstock from top to bottom and from edge to edge through the center.  Scoring will really help with folding crisply along the lines.  After both directions are scored, fold the card stock along one line.  Unfold and fold on the other line.  Unfold again.


Step three:  Turn the cardstock over and score from corner to corner, diagonally.  Repeat with other diagonal.  After both scores are made, fold along score lines, as you did in step two.  Make sure that the horizontal/vertical folds were made on one side of the paper, and the diagonal folds are made on the other side of the paper.


Repeat steps two and three on the remaining 12" x 12" papers.

Step four:  Lay the three pieces of cardstock side by side on the table from point to point, being sure the folds are all oriented the same way.  Take the middle page and turn it over.  Overlap the squares of the three papers as shown in the photo, and glue together.


Step five:  Begin gluing your scrapbook squares and triangles to the 3 assembled pieces of cardstock.  Mix and match papers, use coordinating papers, just generally have fun.  I have done a few theme albums for holidays.


Step six:  Carefully refold the papers, making sure they fold properly, and lay flat.


Step seven:  Glue one covered foam core board to the top and one to the bottom of the stack, making sure the pages are centered on the foam core squares.

It may be helpful to weight the album with a heavy book until the glue is dry.
Step eight:  Glue a ribbon to the front only of the book, paying attention to which direction the book opens in.  Make sure the ribbon is long enough to wrap around the back of the book, and tie on the right hand side.  If desired, you can glue pieces of paper over the ribbon, to use as both an anchor, and a way of labeling the scrapbook.  You can also add stickers, photos, or other embellishments if you wish.


After you complete the scrapbook, open it up and add your photos.  This makes a compact little album, which makes a great gift for just about anybody.  Have fun!

Saturday, May 28, 2011

Mini Purse Giftbag Tutorial

Hi there!

I'm trying to catch up on some of the things we've done in the last couple of months.  Back in April, the girls' elementary school sponsored a craft/rummage sale fundraiser, and my mom and I participated.  As happens to me prior to EVERY craft sale, a couple of days before the sale, I start feeling the frantic urge to add to my stock, as I'm usually caught up on projects for gifts, not for sale.

This time was no exception, so I made 26 of these gift bags, which I was shown at a MOPS craft day.  The supplies you need are:

  • a lunch bag size paper bag
  • scrapbook paper
  • colored card stock
  • ribbon
  • self adhesive Velcro dot
  • glue
  • embellishment for the flap
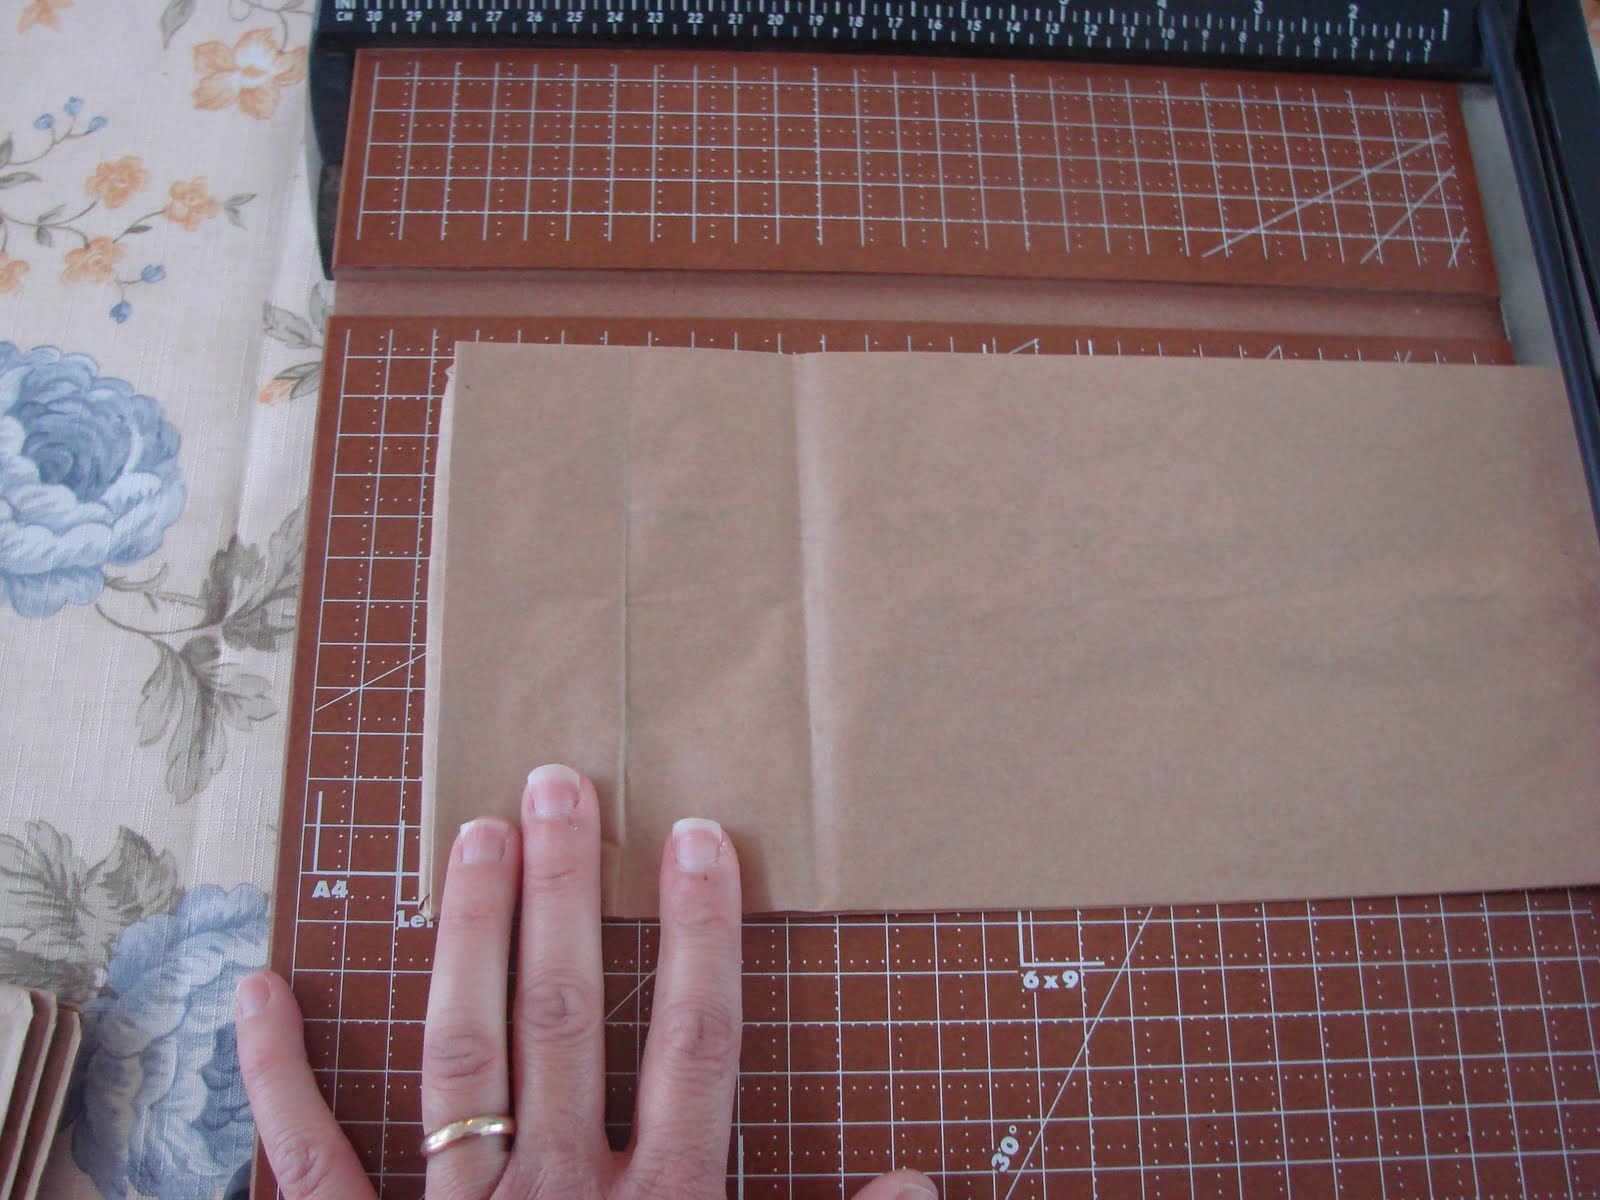
To begin, take your paper bag and fold down the flap to meet with the bottom edge of the bag.  Cut the bag 4 inches tall from the bottom of the flaps.


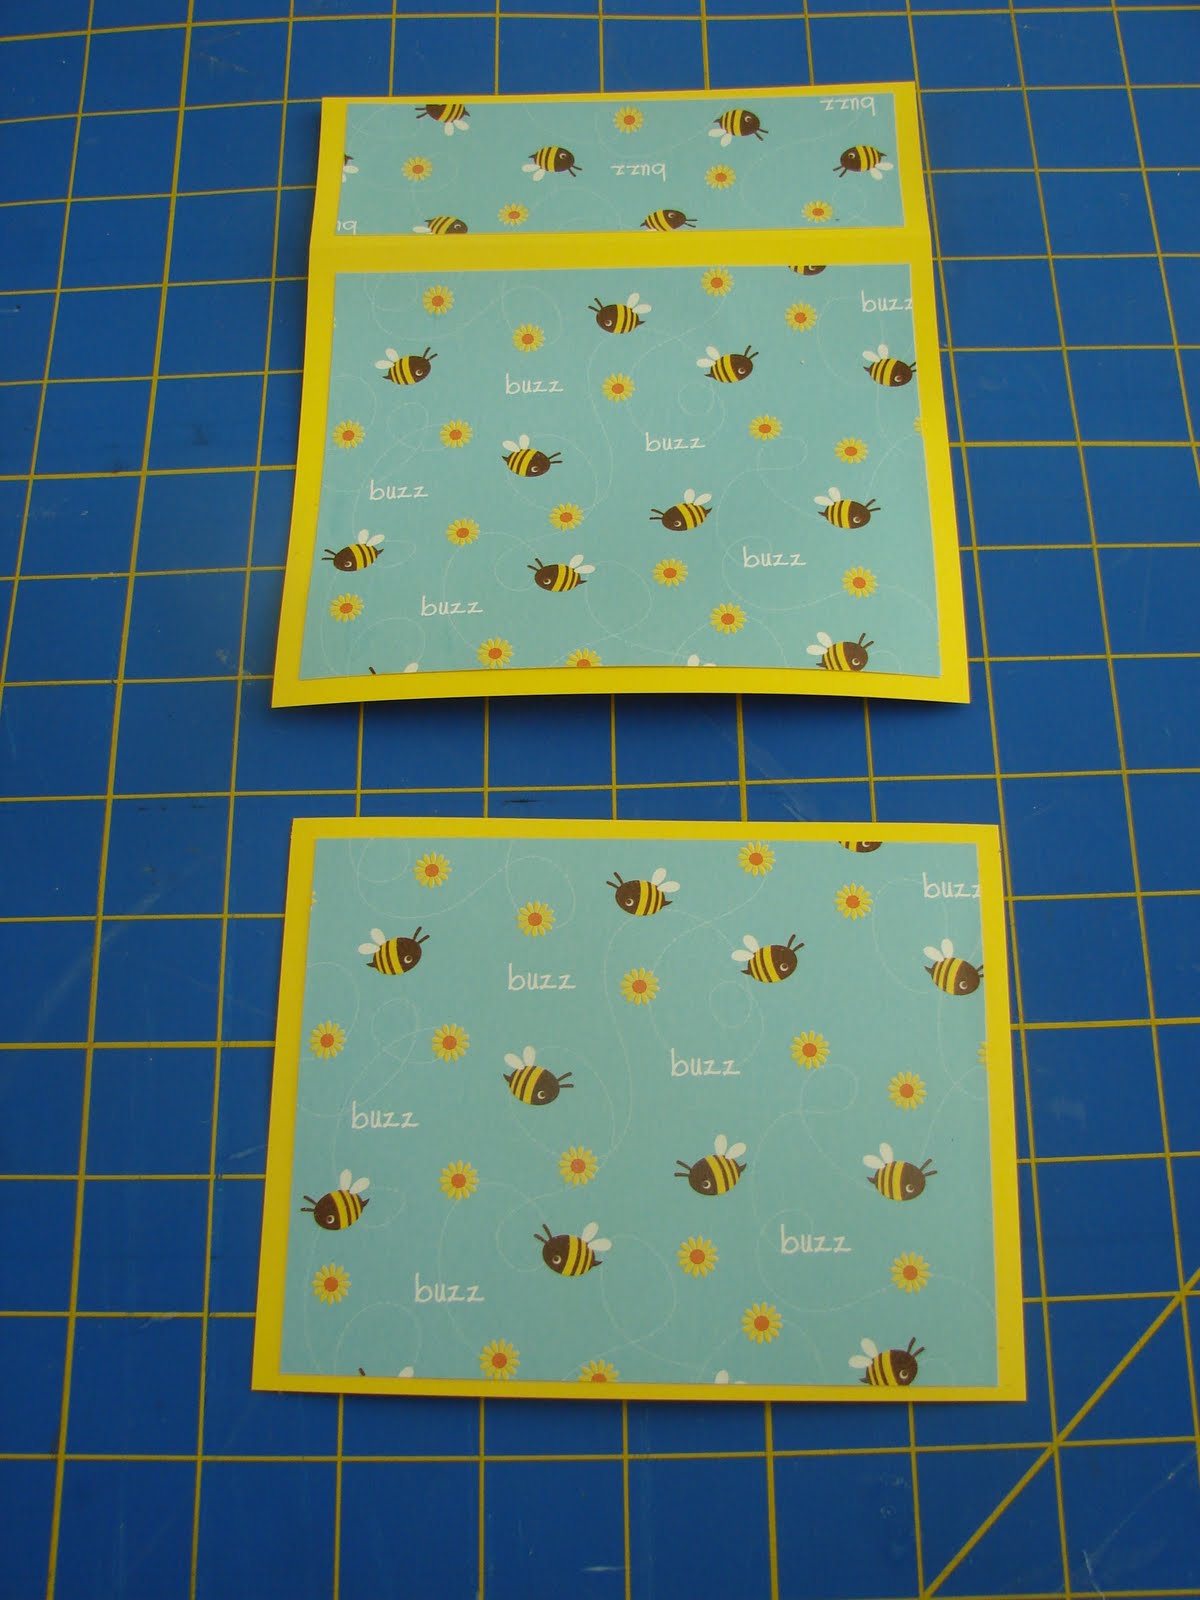
Cut your scrap book paper into 3 pieces: 2 of them 4" x 6", and one 1 1/2" x 5".  Cut your colored card stock into 2 pieces:  one 4 1/4" x 5 1/2", 6 1/4" x 5 1/2".  This is what you should have:


Take the larger of your colored card stock pieces, and score it cross ways 1 3/4" down from the top edge.  Fold along the score line.


Glue your scrapbook paper pieces to your cardstock pieces, keeping even colored margins around each pieces.  Pay attention to the patterns if they are directional or continuous patterns.  Your folded piece will be the back of the bag, but the flap will be on the front.

Now it's time to attach the colored papers to the paper bag.  I used white glue, thinned with a little bit of water, and a sponge brush.  It seemed to work really well.  Be sure to leave an evenly spaced colored border around the bag, and to line up the edges of the front and back pieces.

Punch 2 evenly spaced holes in the fold of your cardstock.  Thread your ribbon through, and knot the ends.  Make sure you use the smallest hole punch you can find, or your knots will have to be huge!


Center a Velcro dot on the front of the bag, and center the corresponding piece on the flap.  In order to make this a little easier, I stuck the two dots together, peeled off the paper backing, and attached the first dot to the bag.  Then, I closed the flap, pressing it down on the sticky part of the other dot.

Close the flap, and add the embellishment of your chose to the flap, just over the Velcro dot.  Some ideas are buttons, jewels, stickers, etc.

When you open up the bag, you have a gift bag that looks like a small purse, and is just right for a small gift.


These projects are easy, inexpensive, and limited only by what is available at your local craft store.  And, as you can see, they are easy to do on a large scale!

Have fun, and I'll be back soon with another idea!

Tuesday, March 29, 2011

Recycled Wool Sweater, Part 2

In yesterday's post, I showed you the hats I made with the recycled wool sweaters.  While I really enjoyed that project, it did leave me with a problem.

What in the world was I going to do with 3/4 of a sweater?  Throwing this out was not an option, nor was putting it back in a bag in the garage.  What to do, what to do...I know, I'll make a bag!

To begin, I cut off the features of the sweater that I wanted to preserve, namely the buttons and the pockets.

I squared up the pieces, to get some idea of the size of the bag I would be making.  Basically, the sweater dictated everything about the finished bag to me.

I did not work from a pattern at all on this.  I did determine that the button bands, as they were, were way to bulky.  Plus, I did not want my bag to be unbuttoned.  So, I set about to "de-bulk" them, and sew the sides closed.


I cut away the extra bulk of the sweater, making sure to leave the buttons in place, which is what those little square are:


I matched up the pieces again, and sewed them together through both pieces:

Next, I figured out what I wanted to do about handles.  My goal was to use as much of this sweater as I could, so I cut strips out of the upper back of the sweater:

I sewed these into tubes, and turned them right side out.

They were a little stretchier than I wanted, so I threaded a piece of bias tape through them, and sewed them across the ends.

I didn't relish the idea of sewing through two layers of wool sweater;  my poor sewing machine was not looking forward to it either, so I went to the stash in the garage and found some lightweight denim fabric, which I used to frame the sweater pieces.  Plus, it gave the bag a classic "jeans and sweater" look.
After sewing the pieces together, I had this:

Not enough structure for the type of bag I had in mind.  So, back to the garage, where I found a large piece of mat board, left over from another project.  I measured, cut and taped, and made this framework for the interior of the bag:

Which meant that now it was time to make a lining.  Back to the garage for fabric and fusible fleece, plus the instructions for the bag I made my mom for her birthday last year.  I really liked how the pockets in that bag worked, and wanted to make some for this bag.  I love pockets in tote bags!

The pockets for one side of the lining with various objects showing where the pockets are.  I made the other piece with 4 pockets.
Next, I finished the lining, and squared off the bottom:


After inserting the lining into the bag, I pinned around the top edge, in preparation for hand sewing the lining in.

And here is the finished product:


I LOVE this bag.  It is the right width for holding skeins of yarn upright, which really helps with center pull skeins.  I can use this bag when I knit on the go, and it will keep the yarn contained.  Lots of interior pockets for needles, hooks, scissors, etc.  And, it was a stash buster project!  I did not buy one new thing in the construction of this bag!

Someday, hopefully soon, I will be making a different style bag from the other hat.  When I get it finished, I will post it here!