Showing posts with label cooking. Show all posts

Tuesday, May 31, 2011

My husband is AMAZING!

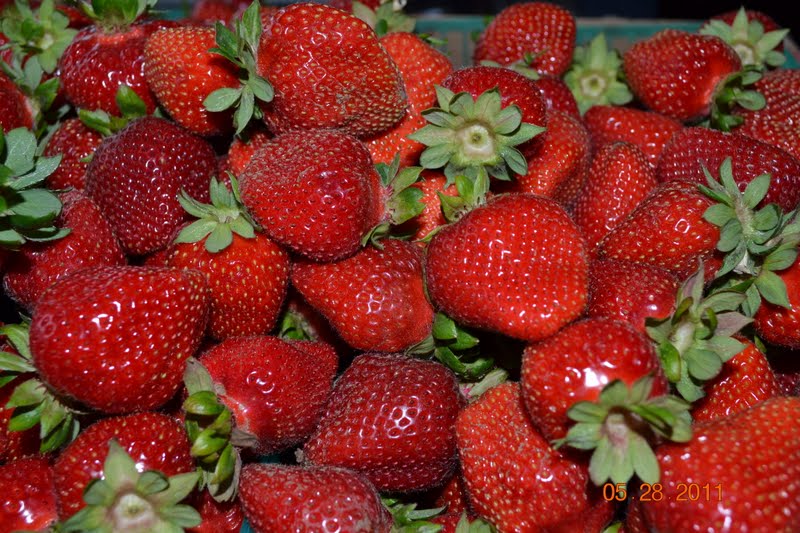
Last Thursday, Don came home from work with a flat of absolutely beautiful strawberries.  We have a local stand, and their berries are delicious.  For the past couple of years, I've bought between 2 and 6 flats of strawberries, and made jam from them.  Last year, I didn't make any, because in 2009, I made about 100 jars, and we didn't need any.

This year, however, we have been running low.  And I've not made any moves to fix the situation.  So, Don bought strawberries.  I told him that I wasn't ready to do that this weekend, and his reply was....."I know.  I'm going to do it this year."  This made me pause.  When Don and I met, he was not exactly, um....fluent...in kitchen skills.  Being a bachelor, he didn't really have to be.  And while he has come a long way, I was not quite sure that he was up to jam.  Was I ever wrong!
See how beautiful?
Friday morning, I went to the grocery store to buy sugar and pectin.  Saturday morning, we bought more strawberries, more sugar, and more pectin, as well as canning jar lids.  Then the work began in earnest.
Sorting and washing strawberries.

Hulling berries.

Mashing the berries, a cup at a time.
One of three containers of puree.
Let me say right here that Don had minimal help from me.  I kind of advised from the sidelines with advice like "Technically, you're supposed to do this, but I do it a different way."  Without exception, Don chose to do it the way you are supposed to, which is actually better.  I like to take shortcuts.

Sugar, measured and ready for the pot.

Maddie, watching and "supervising".

Cooking the puree and pectin.

Maddie, making sure that Dad is stirring properly.
I am really quite impressed.  Not only did he make the jam, he cleaned up as he went along, a fairly unfamiliar process in my kitchen.  Which was good, as I had scrubbed the kitchen thoroughly the day before.
Lids, sitting at the ready in boiling water.

Adding sugar to the pot.
The boiling stage is over.

Filling the jars.


The first jar, ready for the hot water canner.
Truly, the biggest contribution I made to the day was finding empty jars in the garage.  And I didn't need to do that, Don could've found them easily.

At the end of the weekend, we had 40 jars of jam for the shelf, plus one in the refrigerator.  It is soooo yummy!  The kids had fresh strawberry jam sandwiches all weekend! 

Now that I know that Don can, and is willing to make jam, the sky's the limit!  I wonder if he realizes that I'm hoping to go cherry picking this weekend????

See you soon!


Wednesday, May 25, 2011

Easter Sunday


OK, so I'm a little late on this, but I'm going to go ahead and post it now.  Better late than never, right?

Our family begins their Easter celebration the night before, with egg dyeing.  We let all of the kids participate, which makes it extra fun.  Extra messy, too, and they usually have colored fingers for church the next day, but that's all part of the fun.  This was the first year that Maddie participated:

We colored a total of 48 eggs, I think, which gave each of the 6 kids 8 eggs.


Abby & Katie


Brittany, Emma, and Maddie

Emma, Maddie, and Don
I didn't dye eggs this year, for perhaps the first time ever.  I got a much easier job:  assembling breakfast casseroles for the next morning.  Have you ever made an overnight casserole?  We have a couple that we really like.  One is bread, ham, and cheese, layered, and then a beaten egg mixture poured on top.  The other is a french toast casserole, which is a sweetened milk/egg mixture poured on top of cubed bread.  Both are put in the refrigerator overnight, then put in the oven the next morning.  They are great for large brunch get togethers!  Here is the recipe for my favorite French Toast casserole.  The only things I change are that I cut the bread into 1" cubes, and I sometimes use maple flavored french toast bread.

I also got together all the ingredients to make Resurrection Cookies with the girls.  They are basically meringe cookies, but each ingredient and step is tied to the Easter story.  For instance, these called for pecans, which you place in a resealable bag.  The kids beat them with a wooden spoon, which represents the harsh treatment Jesus faced.  The kids taste each ingredient along the way, and you explain the correlation, along with reading Bible verses.  The vinegar represents the vinegar Jesus was given on the cross, the eggs represent new life, the salt represents the salty tears of Jesus' disciples, the sugar is the sweet promise that was fulfilled, the white color represents purity in God's eyes of those clensed of their sin.  You put the cookies in a preheated oven, turn the oven off, and seal it with scotch tape, to represent the sealed tomb.  When the kids get up in the morning, you "unseal" the oven, and give each child a cookie, telling them to break it open.  It is hollow inside, which represents the empty tomb.  Here is the site where I got the recipe.  I really liked them, and think we will make that part of our tradition.  The kids didn't like them so much, but I think that was because there were nuts in them!

We all went to church in the morning, and were met at home by Mom, Dick, Becky, and a couple of Brittany's friends.  While Brittany, Becky and I worked on breakfast, the kids had their egg hunt.  I missed most of it, as I was in the kitchen, but Don took some pictures.


Emma and Abby
Katie
Maddie and Katie

Emma and Katie.  See that blur?  That's how a lot of our pictures came out that day.  The kids move faster than the camera!
Yes, our egg hunt was in the house.  It was raining, or threatening to rain, all day.  We've not had an egg hunt outside since we moved to this house, 4 years ago!  But the kids had fun, and it did limit the spots for hiding eggs, which is both good and bad.


Here are the girls in their Easter dresses, before the hunt started.  This was one of the few times they sat still all day!

After brunch, we all just hung out and played games.  Mom, Dick, and Becky stayed, and it was a very relaxing day.  We also did the full Easter dinner:  ham, scalloped potatoes, deviled eggs, broccoli salad (Mom's special recipe, and a family favorite!), asparagus, applesauce, and rolls.  I found a recipe for Blender Hollandaise sauce, that was so quick, easy and GOOD that I'll never used the packaged stuff again.  As a matter of fact, I've made it twice since Easter!  Dessert was a carrot cake roll with cream cheese frosting, which can be found here.  This cake is much easier than it looks, and completely worth the effort.  Best carrot cake I've ever had, I think!

Anyway, I hope you've enjoyed this belated look at our holiday.  I'll be back tomorrow, with a look at Brianna's birthday party.  See you then!

Wednesday, March 30, 2011

More homemade goodies for the freezer!

Another one of my favorite cookbooks these days is "Taste of Home:  Mom's Best Made Easy".  I came across this recipe, and had to try it!

Easy Egg Rolls
1 pound of ground beef
1 package (16 ounces) coleslaw mix (not the kind with dressing)
2 tablespoons soy sauce
1/2 teaspoon garlic powder
1/4 teaspoon ground ginger
onion powder to taste,
40 egg roll wrappers
1 tablespoon all purpose flour
Oil for frying

In a large skillet, cook the ground beef.  Drain very well.


In a mixing bowl, combine coleslaw mix, soy sauce, ginger, garlic powder and onion powder. 

Add the ground beef and mix well.

In a small bowl, mix the flour and enough water to make a paste.  (I actually omitted this step, and used plain water.)
Working with one egg roll wrapper at a time, Place a heaping tablespoon of beef mixture in the center of the wrapper.  Keep the other wrappers covered with a damp paper towel.


Fold the bottom corner over the filling:


Then the side corners into the center:

Moisten the top corner with your flour/water paste mixture, (or plain water), and roll up tightly:


Place on a parchment paper lined cookie sheet until all egg rolls are made.


Those are Brittany's fingers, so I figured she wanted to be included in this post.  Here she is:

Whoops, guess I was wrong!

In an electric skillet, heat 1 inch of oil to 375 degrees.  Fry egg rolls 3-5 minutes, or until golden brown.  Serve with sweet and sour sauce, if desired.  I actually cooked them in the oven the first time.  Arrange on a cookie sheet, spray with non stick cooking spray, and bake at 375 degrees until golden brown.  They were good that way too, but next time, if I have room on my stove, I will fry them.

This recipe made 40 egg rolls, which is way too many for us to eat at one meal.  So, you guessed it, I froze them!  After lining them up on cookie sheets, I stuck them in the freezer.  Once they were solid, I removed them to a ziptop bag, and labeled them.  This way, I can take out only what I need for a snack or a meal.  All in all, this recipe took me about an hour to finish.

I can see that this recipe would be very versatile, as well.  Next time, I will use ground pork, and possibly add some bean sprouts.  You could vary the amounts of garlic, onion, and ginger powder you use.  You could also substitute teriyaki or plum sauce for the soy sauce.  Use this as a spring board....as an almost complete departure from the traditional egg roll, you could use ground pork, barbecue sauce, and coleslaw mix for a pulled pork sandwich type of experience.  Experiment, I know I'm going to!


Saturday, March 26, 2011

Soup Day, part 2

As promised, here is the recipe for the Pioneer Woman Sherried Tomato soup, with a modification.

1 medium white or yellow onion, chopped
6 tablespoons butter
Two 14.5 oz cans diced tomatoes
One 46 oz bottle or can of tomato juice (I used vegetable juice)
3 to 6 tablespoons sugar
1 or 2 tablespoons chicken base, or 3 chicken bouillon cubes
Freshly ground black pepper
1 cup sherry (optional, but it really adds a nice flavor)
1 1/2 cups heavy cream
1/4 cup chopped flat leaf parsley
1/4 cup chopped basil

Melt the butter in a large pot.  Add the onion, and sautee until translucent.

Add the diced tomatoes, then the tomato juice.  Stir to combine, then stir in the sugar and bouillon.  (I used 3 tablespoons of sugar, and bouillon granules.)

This is where I changed the recipe slightly.  The first time I made this soup, I made it exactly as written, and it was good, but I didn't like the feel of so many chunks.  I wanted a really smooth soup, so I used my immersion blender to puree it.  You could do the same thing with a regular blender or food processor, working in batches, and returning it to the pot.
Add the black pepper to taste, and stir to combine.  Heat almost to boiling, then turn off the heat.  Now to add all of the flavor...the sherry!


Next, add the cream and the chopped herbs.


Stir to combine, and enjoy.  Both times that I've made this, I've frozen it in individual portion sizes, and it reheats beautifully.  Just the thing to have on hand for rainy, cold days.  Try this soup, you won't be sorry!


Friday, March 25, 2011

My soup day

As you no doubt know, my husband has built a fabulous garden for us in the backyard.  I like to refer to it as "my garden", but the realtiy is that it is his, and he takes great pride in it.  He designed it, built it from the ground up, hauled the dirt, installed the irrigation system, and does most of the planting.  The only part that is truly mine is making yummy things from the produce that results.

Last fall, we planted broccoli, cauliflower, brussel sprouts, cabbage, carrots, and romaine lettuce.  While everything did pretty well, we are particularly pleased with the cauliflower.  Two weeks ago, Don picked the last 3 heads.  Don cut 2 of them into florets, blanched them, and left them for me to freeze.  We got 4 one pound packs to put in the freezer.  With the last one, I decided to make Cream of Cauliflower Cheese soup.
Katie, holding one of the "smaller" cauliflowers. 
Here is my recipe for Cream of Cauliflower-Cheese Soup:
4 cups fresh Cauliflower florets
1 1/2 cups chicken broth
1 tablespoon butter
1 tablespoon flour
1/2 teaspoon celery seeds
1/4 teaspoon salt
black pepper to taste
1 cup milk or half-and-half
1/2 cup shredded American cheese

I cut up the last cauliflower and came up with 16 cups of florets, so I made a quadruple batch.


Step one:  In a large saucepan, cook vegetables, covered, in a large amount of boiling water for 8 to 10 minutes.  Set aside 1 cup of cooked vegetables. (I skipped this part.)

Step 2:  In a food processor combine the remaining cooked vegetables with 3/4 cup of broth.  Cover and process until smooth, about 1 minute.  Set aside.  (I pureed the whole amount of vegetables.)

Step 3:  In the same saucepan, melt butter.  Stir in flour and seasong.  Add milk all at once.  Cook and stir until slightly thickened and bubbly.  Cook and stir 1 minute more.


Step 4:  Stir in blended vegetables, remaining broth, and cheese.  Cook and stir until heated through, adding additional milk if necessary, to reach desired consistency.  If desired, season with additional salt and pepper.  (Here, I added a little bit of fresh ground nutmeg.)

I didn't have shredded American, so I cubed a pack of slices.


Of course, being me, I packaged most of this soup in single sized portions, and put it in the freezer.

Many packages of yummy goodness!  I hope you try this recipe, it's great for rainy days!

(Up next, the recipe for Pioneer Woman Sherried Tomato soup, pictured above!)